Watch the Video Tutorial
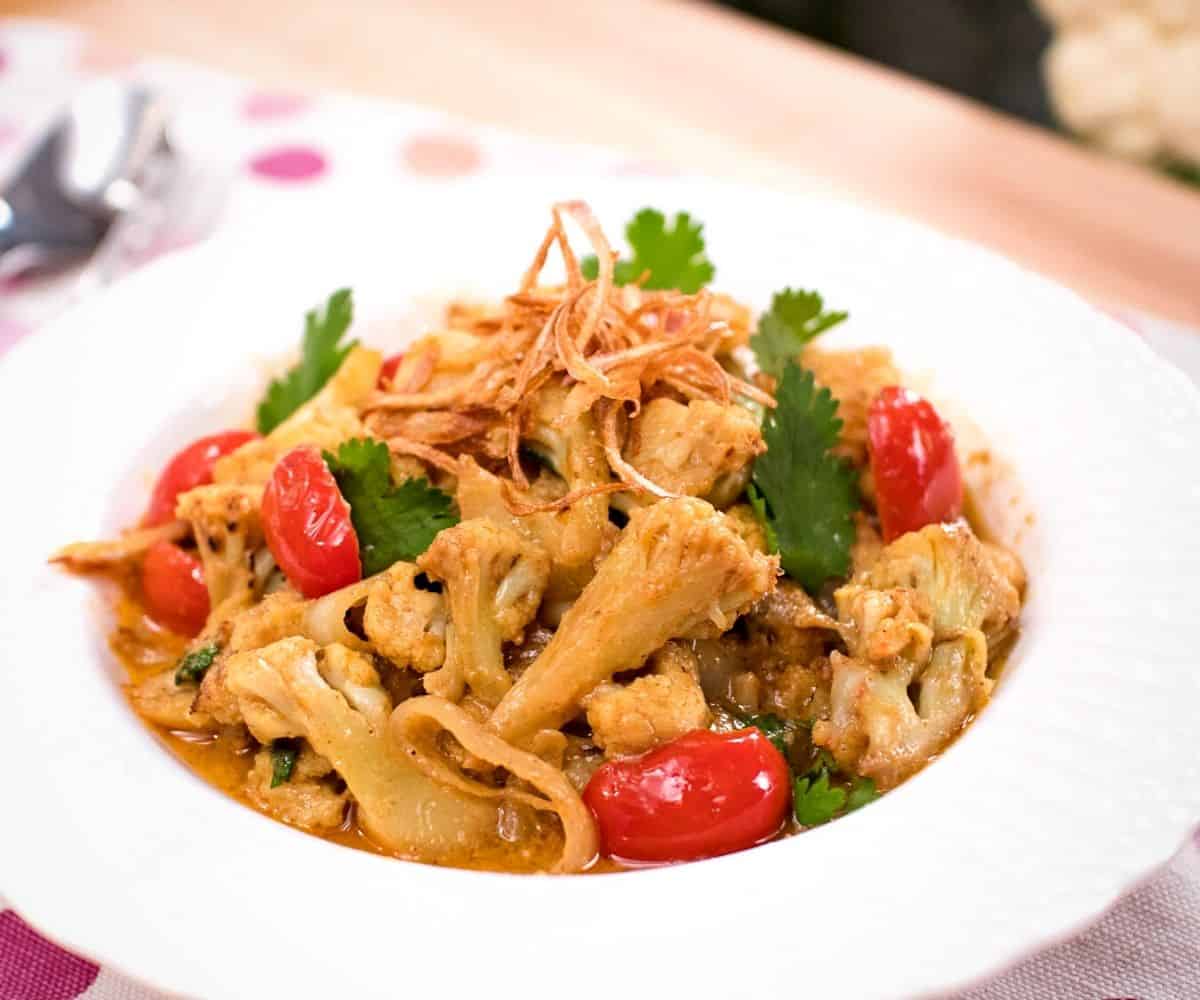
You want the robust flavour of a Thai curry, but as quickly done as a stir-fry, this recipe is your answer. Cauliflower is seared to develop a more intense flavour, then stir-fried in coconut milk and Thai curry paste. It's a flavour-packed, healthy dish that is delicious as vegetable side dish, but is also robust enough to be a vegetarian entree. Adding meat or other proteins is also an option too!
Want to save this recipe?
Ingredients
- 350 g cauliflower florets. Don't cut them too big, and cut them so that there is a flat side which will allow for nice browning.
- 1 teaspoon fish sauce. To make this vegan you can substitute soy sauce or a pinch of salt
- ⅔ cup coconut milk, see this post for how to choose good coconut milk.
- 2 tablespoon yellow curry paste, store bought is fine. I use Mae Ploy brand for this recipe, but if you want to make it from scratch, here's my yellow curry paste recipe.
- 1 teaspoon paprika, this is completely optional. I only add it to brighten the colour up a bit.
- 1 ½ tablespoon palm sugar, or light brown sugar
- ¼ onion
- ½ cup cherry tomatoes
- Chopped cilantro for garnish, optional
- Fried shallots, this is an optional garnish for some extra crunchy yumminess. You can buy fried shallots from Asian grocery stores, but I recommend refreshing them in a 300°F oven for 5 minutes to make them crispier. If you want to make it from scratch, here is my DIY fried shallots recipe.
How to Make Cauliflower Curry Stir Fry
Here are the steps, but if this is your first time, I highly recommend watching the video tutorial to ensure success!
- In a large skillet over medium high heat, add just enough oil to coat the bottom. Before the oil gets too hot, add the cauliflower, sprinkle on the fish sauce or salt, and toss briefly to mix. Arrange the cauliflower so that the flat side is touching the pan. Let sear for a few minutes until browned.
Tip: You can sear the cauliflower on one side if you wanna be quick, or you can flip the florets and sear them on another side as well to maximize flavour. - In a wok, add half of the coconut milk and bring to a boil over medium high heat. Stir in curry paste and paprika (if using) then reduce the coconut milk until thick and the coconut oil starts separating from the paste and the paste is sizzling.
- Add palm sugar and stir to mostly dissolve it. Add the remaining coconut milk and stir to mix.
- Add onions, stir briefly to break up the layers, then add the cauliflower and keep tossing until the florets are done to your liking. Timing will depend on how cooked the cauliflower is from searing, and how soft/firm you like them. If the sauce dries up before the cauliflower cooks, add a splash of water to buy it some more time.
- Once cauliflower is done, add the tomatoes and toss for 30 seconds to heat through. Turn off the heat, then taste add more fish sauce or soy sauce as needed.
- Toss in cilantro to finish. Plate and top with some fried shallots if you wish, and serve with jasmine rice!
Recipe Variations
There are many different ways to change things up for this recipe!
- Use a different curry paste! Red curry paste, green curry paste, or even massman curry paste will all work and yield different flavours.
- Add protein. If you want to make this a complete meal, you can add meat or vegan protein right into it. If using meat, thinly slice them into bite-sized pieces, and let it marinate in a little fish sauce while you prep. Then, add it in after step 3, before adding the onions, and cauliflower after the protein has mostly cooked through.
Recipe Tips
- The searing step might seem like extra work you are tempted to skip, but that is the step that makes all the difference. When you sear the vegetable you brown it which means you're developing bold, intense flavour. AND you're also drying it out of its liquid which means you're concentrating the natural flavours.
If you throw them raw into the wok, 1) they'll take way longer to cook, so you're not really saving that much time, and 2) you'll be eating an equivalent of boiled cauliflower by the time it's done in terms of texture. - Always, always taste! When cooking with store bought curry paste, there can be a huge range in terms of saltiness, spiciness, and strength of flavour. So it's important to taste and adjust before you put the dish on the table. For more on variation between brands, see my store-bought curry paste review!
Watch The Full Video Tutorial!
All my recipes come with step-by-step video tutorials with extra tips not mentioned in the blog post, so make sure you watch the video below to ensure success - and if you enjoy the show, please consider subscribing to my YouTube channel. Thank you!

Quick Cauliflower Curry Stir Fry
- Yield: Serves 2-3
Ingredients
- 350g cauliflower florets
- 1 tsp fish sauce or a pinch of salt (see note)
- ⅔ cup coconut milk, divided
- 2 Tbsp yellow curry paste (store bought)
- 1 tsp paprika (optional, for added colour)
- 1 ½ Tbsp palm sugar
- A dash fish sauce or soy sauce as needed (this will depend on the saltiness of your curry paste)
- ¼ onion
- ½ cup cherry tomatoes
- Chopped cilantro for garnish, optional
- Fried shallots (optional, recipe below, see note)
Want to save this recipe?
Instructions
- In a large skillet, add just enough oil to coat the bottom. Turn the heat on to medium high, and before the oil gets too hot, add cauliflower and sprinkle on some fish sauce or salt, toss briefly to mix. Arrange the cauliflower so that the flat side is touching the pan. Let sear for a few minutes until browned. You can just sear them on one side if you wanna be quick, or you can flip the florets and sear them on another side as well. We're not looking for them to be fully cooked at this point, the goal is to develop browning and flavour; we will finish cooking them in the wok.
- In a wok, add half of the coconut milk and bring to a boil over medium high heat. Stir in curry paste and paprika (if using) then reduce the coconut milk until thick and the coconut oil starts separating from the paste and the paste is sizzling. Add palm sugar and stir to mostly dissolve it. Add the remaining coconut milk and stir to mix.
- Add onions, stir briefly to break up the layers, then add the cauliflower and keep tossing until the florets are done to your liking. Timing will depend on how cooked the cauliflower is from searing, and how soft/firm you like them. If the sauce dries up before the cauliflower cooks, add a splash of water to buy it some more time.
- Once cauliflower is done, add tomatoes and toss for 30 seconds to heat through. Turn off the heat, then taste add more fish sauce or soy sauce as needed. Toss in cilantro to finish. Plate and top with some fried shallots if you wish, and serve with jasmine rice! Enjoy!
How to Make Fried Shallots
Note: you can fry as much shallots as you want, but they do shrink a lot when fried so make sure you cut up more than you want to end up with.
- Thinly slice shallots as evenly as possible.
- Lay the sliced shallots out on a plate lined with paper towel. Sprinkle some salt over the shallot, making sure all pieces are salted. Let the shallots sit for about 10 minutes and you'll notice the salt drawing moisture out from the shallots.
- Take a piece of paper towel and press it onto the shallots to absorb the water.
- Add about 1″ of oil to a pot, and heat it until it reaches 275-300°F (if you don't have a thermometer, you can just add the shallots to cold oil and let heat it up together until they're bubbling, but it takes longer to heat up that way.)
- Add the shallots to the oil and fry them on medium-low heat (gentle bubbling), stirring frequently, until they turn golden brown and the bubbling has subsided. Remove them slightly before they reach the desired colour as they will continue to darken.
- Let them drain off and cool on a plate lined with paper towel.
Notes
- You can actually buy fried shallots in a jar from Asian grocery stores, but I prefer to fry them myself as the flavour is better. If you want to make it yourself, the recipe is at the bottom, and you can also watch this video for some visual aid 🙂 Once shallots are fried, you can keep them in an air-tight container for a few days, but they will lose crispness eventually so it's best not to make too much.
- I use fish sauce in the recipe, but to make it vegetarian/vegan, simply use soy sauce or salt instead.


V says
Hi, I have some red curry paste. Can I use that instead
Pailin Chongchitnant says
sure can!
Lisa says
Made this tonight and everyone loved it! A win for kids and grownups, and a plus for our family’s pledge to incorporate more meatless dishes into our weeknights.
Sandie A. says
Turned out pretty flavorful! The fried shallots make it and is worth the extra time!
Tara Brown says
Love this recipe! It was quick, easy, and packed with flavor. I am officially adding it into my dinner rotation. Thank you!
Michael Esfeld says
Hi! Last night I saw one of your recipes on YouTube for a curry cauliflower, fried tofu dish that I now can’t find! You suggested it with rice and it looked delicious. I’ve seen a couple on your channel that are close but not what I saw and thought I saved. Can you help me find it? Thank you!