Jump to video!
Want to save this recipe?
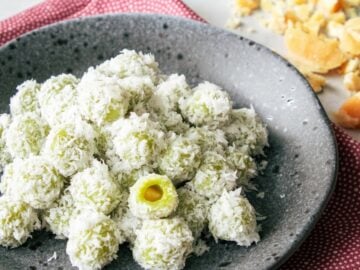
This popular street food is also the easiest doughnut recipe ever! (Or more like doughnut holes?) No yeast, no kneading, no proofing, yet they still have that yummy chewiness and airiness we all love in doughnuts. Sweet potato makes up the majority of the dough, so not only does that make it flavourful, it's even healthier! As healthy as doughnuts could ever be anyway 🙂
You can use any kind of sweet potato you like (or even mix in some taro) as long as they're not the orange-flesh ones often referred to as "garnet yams" or "jewel yams" because they are too wet. If you can get the really dark purple sweet potatoes, they make the most beautiful purple doughnuts!
Make sure you eat this while they're fresh as they don't keep well. The dough can be made in advance and kept in the fridge for a few days, so you can fry up only as much as you can eat in 1 sitting. Warning, they are absolutely addictive!
Watch The Full Video Tutorial!
All my recipes come with step-by-step video tutorials with extra tips not mentioned in the blog post, so make sure you watch the video below to ensure success - and if you enjoy the show, please consider subscribing to my YouTube channel. Thank you!

Easy Sweet Potato Doughnuts ขนมไข่เต่า ไข่นกกระทา
- Yield: About 35 bite-sized balls
Ingredients
- 200 g sweet potato (peeled weight, see note)
- 2-3 tablespoon sugar (depending on sweetness of the potato, but 2 ½ is a good place to start)
- Scant ¼ tsp salt
- 30 g tapioca starch
- 15 g all-purpose flour
- ¼ tsp baking powder
- 1-3 tablespoon coconut milk (depends on moistness of the sweet potato)
- Frying oil
Want to save this recipe?
Instructions
Tip: You can make this dough in advance, and keep in the fridge until ready to fry. You can roll the balls in advance too, but make sure you keep the dough in a well-sealed container so they don't dry out.
- Cut sweet potato into chunks and steam them until fully cooked, 10-15 minutes. Pierce the biggest piece is a fork and it should go in with NO resistance. Do not boil them, we want to minimize the moisture of the sweet potato! Transfer the potatoes on to a plate and mash with a fork until smooth. Let it cool to room temp.
- Transfer cooled mashed potato to a mixing bowl, add sugar and salt then stir until combined. Add tapioca starch and flour, then sift in baking powder, then stir everything together briefly just to see where the dough is at in terms of moistness. If it needs more liquid to mix (i.e. there's a lot of dry flour that can't be incorporated) add coconut milk, 1 tablespoon at a time, until all the flour can be incorporated. Make sure you stir in that 1 tablespoon of coconut milk well before adding the next. You do NOT want to add too much liquid or you'll have a hard time forming balls.
- Once all the dry flour has been incorporated, you should be able to form the dough into balls easily, it shouldn't stick to your hands but it should also be soft. You should not need more than 4 tablespoon of coconut milk. See video for the texture of dough you're aiming for.
- Scoop up a heaped teaspoon worth of dough (as in a measuring teaspoon, not your dessert spoon), and roll them into balls.
- Add enough oil into your pot to make sure it is deeper than the diameter of your balls because you want to make sure the balls can be completely submerged.
- Heat the oil to 325°F, add the balls and make sure you stir them as soon as they go in—they will sink to the bottom in the beginning and if you don't stir them soon enough they will develop a brown patch where they touch the bottom of the pot.
- Keep frying them, and eventually they will float, and once they float make sure you keep stirring them around so that they brown evenly. Let them fry for a full 5 mins, even if they colour has turned golden, in order to give them time to develop a crisp crust. Keep your temp around 325°F or they could brown too quickly. Note: If after 5 minutes of frying they're still not brown enough, just crank the heat and get them there. It just means your temp is a little low.
- Scoop them up, shake off excess oil, then place them on a paper-towel lined plate. Immediately put another piece of paper towel on top and roll them around in between two sheets of paper towel to absorb surface oil. Transfer on to a rack to let them cool slightly.
- Serve these once they're cool enough to eat, they're only good when eaten fresh! These do not keep well at all, so only fry as much as you can eat, and keep the rest of the dough to fry up later. The dough will keep in the fridge at least 2 days.
Notes
- As mentioned in the video, any type of sweet potato will work as long as it's not too moist. So the orange-flesh yams often called "jewel yams" or "garnet yams" do NOT work for this because they make the dough too wet. Take note of the texture of the sweet potato in the video when it's mashed, if your sweet potato looks kind of like that OR dryer, it will work fine. You can also sub 50% taro too 🙂


Heidi says
We just came back from a holiday in Thailand and had these at the night markets. Wondering if these can be made in an air fryer?
Marianne says
Delicious! I've tried the recipe a few times and didn't need to add sugar. Once I made this recipe with an orange-flesh sweet potato; instead of steaming, I microwaved it and let it cool down, which evaporated some of its water. No coconut milk in this case, the sweet potato had enough liquid by itself!
I've been trying to experiment with dipping sauces for these bites; I've tried soy sauce and chili oil and it was good. Any other recommendations?
Stephen Chan says
A street food that is so simple yet delicious, so glad I can make it at home!