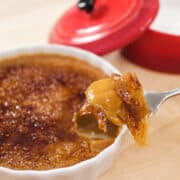
Creme brulee is an easy-but-elegant dessert to make at home, and it's a great one to make in advance! It's also a perfect candidate for being "Thai-ified". The flavour of Thai tea works wonders with the creaminess of the custard, and the slight bitterness of the tea actually balances the richness and sweetness, making it very hard to stop eating! You can make the custard in advance, keep it wrapped in the fridge, and brulee the sugar whenever you're ready to serve. If you don't have a blowtorch, you can also melt the sugar under the broiler, preheat it VERY hot and put the COLD custard on the highest rack. Disclaimer: I've never done the broiler method personally, but I know it can be done. Let me know how it goes!
Watch The Full Video Tutorial!
All my recipes come with step-by-step video tutorials with extra tips not mentioned in the blog post, so make sure you watch the video below to ensure success - and if you enjoy the show, please consider subscribing to my YouTube channel. Thank you!
Ingredients
Here are all the ingredients you'll need to make this recipe. For amounts, check out the full recipe card below.
Want to save this recipe?
- Whipping cream
- Water
- Evaporated milk
- Thai tea leaves
- Sweetened condensed milk
- Egg yolks
- Sugar
- Salt
Note: It is very important that your creme brulee is shallow so you have the right crust-to-custard ratio, so use a shallow and wide ramekins like ones I use in the video. If you only have deep ones, only fill them to about 2 cm deep.
How to Make Thai Tea Creme Brulee
Here are all the steps to make this recipe. If this is your first time, I highly recommend watching the video tutorial to ensure success.
- Preheat the oven to 325°F.
- In a pot, heat cream, water, and evaporated milk until it starts to steam and foam (careful, it can boil over!). Turn the heat off, add Thai tea leaves, stir well and let it steep for at least 5 mins.
- Meanwhile, in a mixing bowl, stir together condensed milk, sugar and salt. Add egg yolks and stir to combine.
- Strain the tea leaves out of the cream using either a fine mesh strainer or a cloth strainer, squeeze or press out as much liquid as you can. If the mixture is too hot for you to squeeze, just let it sit and cool down a bit. Note: If using a mesh strainer, you may get tiny specks of tea dust in your custard, which is fine, it will not affect the flavour and it will look a bit like tiny vanilla bean specks!
- Gradually whisk the tea mixture into the egg mixture, being careful not to lift the whisk and beat in air. Strain the custard through a sieve into a spouted container.
- Pour the custard into 3 standard creme brulee ramekins, set in a quarter sheet pan or a baking tray deep enough to hold about hald an inch of water. Remove any large bubbles by scooping them off with a spoon or flashing them with the blowtorch.
- Place the tray on the middle oven rack, carefully pour hot tap water into the baking tray so that the water comes about half way up the ramekins. Bake for 35-45 mins. To check for doneness, tap the ramekins gently to get them moving, if the custard jiggles like jello, it's done, but if it creates a waving motion on the surface, it is still too liquid.
- Chill completely in the fridge for a few hours.
- When ready to serve, spread 2-3 teaspoons of sugar evenly on the surface. Using a blowtorch or a broiler set on high (rack on highest level), melt the sugar until it is browned. Let it cool for a few minutes until the sugar is hardened. Serve immediately.
Thai Tea Creme Brulee
- Yield: Makes 3 standard size crème brûlée ramekins
Ingredients
- 1 cup (240 ml) whipping cream
- ¼ cup (60 ml) water
- ½ cup (120 ml) evaporated milk
- 3 Tbsp (45 ml) Thai tea leaves
- ⅓ cup (80 ml) sweetened condensed milk
- 4 large egg yolks
- 4 Tbsp sugar
- A pinch salt
Note: It is very important that your creme brulee is shallow so you have the right crust-to-custard ratio, so use a shallow and wide ramekins like ones I use in the video. If you only have deep ones, only fill them to about 2 cm deep.
Want to save this recipe?
Instructions
Preheat the oven to 325°F.
In a pot, heat cream, water, and evaporated milk until it starts to steam and foam (careful, it can boil over!). Turn the heat off, add Thai tea leaves, stir well and let it steep for at least 5 mins.
Meanwhile, in a mixing bowl, stir together condensed milk, sugar and salt. Add egg yolks and stir to combine.
Strain the tea leaves out of the cream using either a fine mesh strainer or a cloth strainer, squeeze or press out as much liquid as you can. If the mixture is too hot for you to squeeze, just let it sit and cool down a bit. Note: If using a mesh strainer, you may get tiny specks of tea dust in your custard, which is fine, it will not affect the flavour and it will look a bit like tiny vanilla bean specks!
Gradually whisk the tea mixture into the egg mixture, being careful not to lift the whisk and beat in air. Strain the custard through a sieve into a spouted container. Pour the custard into 3 standard creme brulee ramekins, set in a quarter sheet pan or a baking tray deep enough to hold about hald an inch of water. Remove any large bubbles by scooping them off with a spoon or flashing them with the blowtorch.
Place the tray on the middle oven rack, carefully pour hot tap water into the baking tray so that the water comes about half way up the ramekins. Bake for 35-45 mins. To check for doneness, tap the ramekins gently to get them moving, if the custard jiggles like jello, it's done, but if it creates a waving motion on the surface, it is still too liquid.
Chill completely in the fridge for a few hours.
When ready to serve, spread 2-3 teaspoons of sugar evenly on the surface. Using a blowtorch or a broiler set on high (rack on highest level), melt the sugar until it is browned. Let it cool for a few minutes until the sugar is hardened. Serve immediately.

Leave a Reply