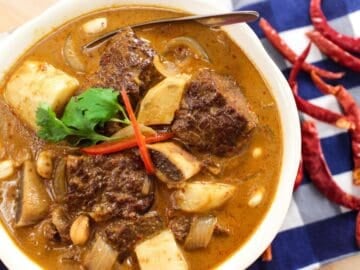
A Little Known Classic Thai Dish
This is a dish that's ubiquitous in Thailand, and a favourite amongst kids and adults alike. Kids love it because it's not spicy. Adults love it because it's just super yummy and goes great with a cold beer! If you know my Garlic Pepper Chicken recipe, this one is a similar idea, but different. Apart from the obvious pork VS chicken, we are also deep frying instead of stir-frying. Trust me, the deep frying makes all the difference!
It's a dish that many people make at home, but you can also find it sold by street vendors or even some nicer restaurants. Have it with some rice as part of a bigger meal, but I also love it with some Thai sticky rice.
Watch The Full Video Tutorial!
All my recipes come with step-by-step video tutorials with extra tips not mentioned in the blog post, so make sure you watch the video below to ensure success - and if you enjoy the show, please consider subscribing to my YouTube channel. Thank you!
Ingredients
Here are all the ingredients you'll need to make this recipe. For amounts, check out the full recipe card below.
- Pork butt, ¼” thick slices (see note)
- Oyster sauce
- Soy sauce
- Fish sauce
- Sugar
- Garlic, divided
- White peppercorns
- Cilantro stems, chopped (keep the leaves for garnish)
- Cornstarch
- Jasmine rice for serving
Note: Pork butt, also known as pork shoulder, is a flavourful and fatty cut that I prefer for this. When you slice it, trim off any large chunks of fat, but leave in the smaller fat streaks that run through the meat. For a leaner option you can also use pork loin or tenderloin, but keep in mind that leaner cuts are not as juicy and flavourful.
How to Make Garlic Pepper Pork หมูทอดกระเทียมพริกไทย
Here are all the steps to make this recipe. If this is your first time, I highly recommend watching the video tutorial to ensure success.
- In a mortar and pestle, pound peppercorns until fine. Add one-third of the garlic and chopped cilantro stems and pound into a fine paste.
- Add herb paste, oyster sauce, soy sauce, fish sauce and sugar to the pork and mix well (it's faster to massage everything in by hand, but wear gloves or your hands will smell like garlic for a long time!). Let sit for 20 mins minimum, and up to one day.
Meanwhile, make fried garlic.
- Chop the remaining garlic as evenly as you can.
- Add about ½-inch of frying oil to a small pot or wok you’re using to fry the pork. Turn heat on to high then right away add garlic. Once garlic starts bubbling, turn heat down to low and fry, stirring frequently, until garlic is light golden. Do not let it brown or it will be bitter.
- Once done, use a fine mesh skimmer to remove ALL the garlic from oil. Alternatively you can pour it through a strainer and return oil back to pot. Don't let garlic bits remain in the oil or it will burn when you fry the pork.
To fry the pork:
- Add cornstarch to pork and mix well. It will look wet and pasty.
- Add more oil to the pot so it's now about 1.5 inch deep and heat to 375°F (190°C) over medium high heat.
- Fry the pork in batches so as to not crowd the pot. Once you drop the pork immediately pull the pieces apart so they are not stuck together. Fry for about 45 seconds to 1 minute only, just until the exterior has browned slightly. Remove with a slotted skimmer and drain on paper towel.
- To serve, sprinkle fried garlic over pork and top with cilantro leaves if desired
- Serve with jasmine rice or sticky rice, and a cold drink!
Fried Garlic & Garlic Oil
Fried garlic is an ingredient that comes up very often in Thai cuisine. We sprinkle it on so many different dishes: noodle soups, dumplings, congee, and deep fried foods like this dish. We use it so much that you can buy jars of fried garlic already made from the store. However, the flavour is so much stronger when you make it fresh.
When you make fried garlic, the oil will become scented with garlic so keep that oil! Sprinkle garlic oil on any dish to instantly add fried garlic flavour. You can keep the oil in the fridge for a few months.
The most important thing is to not to over fry garlic—you want light golden yellow, not golden brown, otherwise you'll have bitter garlic!
Recipe Card
Print
Garlic Pepper Pork หมูทอดกระเทียมพริกไทย
- Yield: 2 servings
Ingredients
- 250g pork butt, ¼” thick slices (see note)
- 2 tsp oyster sauce
- 2 tsp soy sauce
- 1 tsp fish sauce
- 1 ½ tsp sugar
- 1 head garlic, divided
- ½ tsp white peppercorns
- 8 cilantro stems, chopped (keep the leaves for garnish)
- 2 Tbsp cornstarch
- Jasmine rice for serving
Note: Pork butt, also known as pork shoulder, is a flavourful and fatty cut that I prefer for this. When you slice it, trim off any large chunks of fat, but leave in the smaller fat streaks that run through the meat. For a leaner option you can also use pork loin or tenderloin, but keep in mind that leaner cuts are not as juicy and flavourful.
Want to save this recipe?
Instructions
- In a mortar and pestle, pound peppercorns until fine. Add one-third of the garlic and chopped cilantro stems and pound into a fine paste.
- Add herb paste, oyster sauce, soy sauce, fish sauce and sugar to the pork and mix well (it's faster to massage everything in by hand, but wear gloves or your hands will smell like garlic for a long time!). Let sit for 20 mins minimum, and up to one day.
Meanwhile, make fried garlic.
- Chop the remaining garlic as evenly as you can.
- Add about ½-inch of frying oil to a small pot or wok you’re using to fry the pork. Turn heat on to high then right away add garlic. Once garlic starts bubbling, turn heat down to low and fry, stirring frequently, until garlic is light golden. Do not let it brown or it will be bitter.
- Once done, use a fine mesh skimmer to remove ALL the garlic from oil. Alternatively you can pour it through a strainer and return oil back to pot. Don't let garlic bits remain in the oil or it will burn when you fry the pork.
To fry the pork:
- Add cornstarch to pork and mix well. It will look wet and pasty.
- Add more oil to the pot so it's now about 1.5 inch deep and heat to 375°F (190°C) over medium high heat.
- Fry the pork in batches so as to not crowd the pot. Once you drop the pork immediately pull the pieces apart so they are not stuck together. Fry for about 45 seconds to 1 minute only, just until the exterior has browned slightly. Remove with a slotted skimmer and drain on paper towel.
- To serve, sprinkle fried garlic over pork and top with cilantro leaves if desired
- Serve with jasmine rice or sticky rice, and a cold drink!


Olimpia says
I just made this and omg is delicious! Thank you !
Joanna says
Love this recipe. It's quick, easy and delicious! I've used our Berkshire pork Rib eyes.. because that's what I had.
I'm also trying it with cutlets..because now I've run out of Rib eyes!
This is a regular feature now in our house!
Thanks for sharing Pai!
Philip says
Would it ok if we crisp up the pork a little bit more?
Lucy says
This looks delicious and I would love to try making it!
Please can you tell me which types of oil are best to use for frying?
Thank you 🙂
Stephen Chan says
Yummy yet simple, esp if you already have fried garlic on hand
Fred says
I already made the garlic pepper chicken recipe, so I'm quite sure that this pork version will be excellent as well. One question though: I find a temperature of 375F (190C) for deep-frying very high. It seemed to me that in Pailin's video the end of the thermometer was touching the bottom of the wok. Could that have skewed the temperature on the thermometer?
Fred says
I made this dish this afternoon with jasmine rice and Asian vegetables. I used almost a lb of pork shoulder for the two of us. It was really great, there was nothing left. I followed Pailin's instructions to a T, including the high temperature for deep-frying, and it worked out perfectly fine. So, no need to use a lower frying temperature.
pieter says
I make something similar, using tenderloin medallions. Cook this ALOT.
The fast version: Minced garlic (and considerably more, like 3 per person) with portabella wedges, in a wok for 2-3 min. Then the pork, stirring constantly for two minutes or until cooked through.
Then the coarse pepper and brown sugar, followed immediately by the oyster sauce and fish sauce.
Add the pre cooked rice when done to rewarm it. Top with sliced cherry tomatoes, still cold.
Adapted from Thai Taste cookbook.
Using your version to enable me to share the recipe!
Monica says
I always love your recipes, but this one is especially addictive and surprisingly cheap to make when we have all the sauces and cornstarch in the kitchen already.
I am so grateful for you and your recipes. I love Thai food and always rely on your amazing recipes every time I cook it. Thank you, Pai 🙂
Pailin Chongchitnant says
Sp glad to hear! And thank you!
Sasha says
This was so easy & so good!
I actually ran out of cilantro for the marinade so subbed some ground coriander and parsley. Still delicious 😋
Thank you
Ian says
My local Thai store sells a pre-packaged "marinated Thai-style pork" where the marinade is essential the same as Pai's. I make this dish regularly and each time still make Pai's marinate to enhance what's already on the pork I buy, and man is it hard to stop yourself from eating too much.
Helen Scotford says
absolutely delicious and so easy! i didn’t have oyster sauce so used sweet chilli and less sugar, it was so delicious!
Arlene Rafiq says
This is my family's favourite comfort food. However, instead of pork, I substituted it with chicken and it's very delicious. Whenever my family crave for Thai food, I would always go to Pailin's website as her recipes are easy to follow.